Speakr - A personal, self-hosted web application designed for transcribing audio recordings
Speakr
A personal, self-hosted web application designed for transcribing audio recordings.
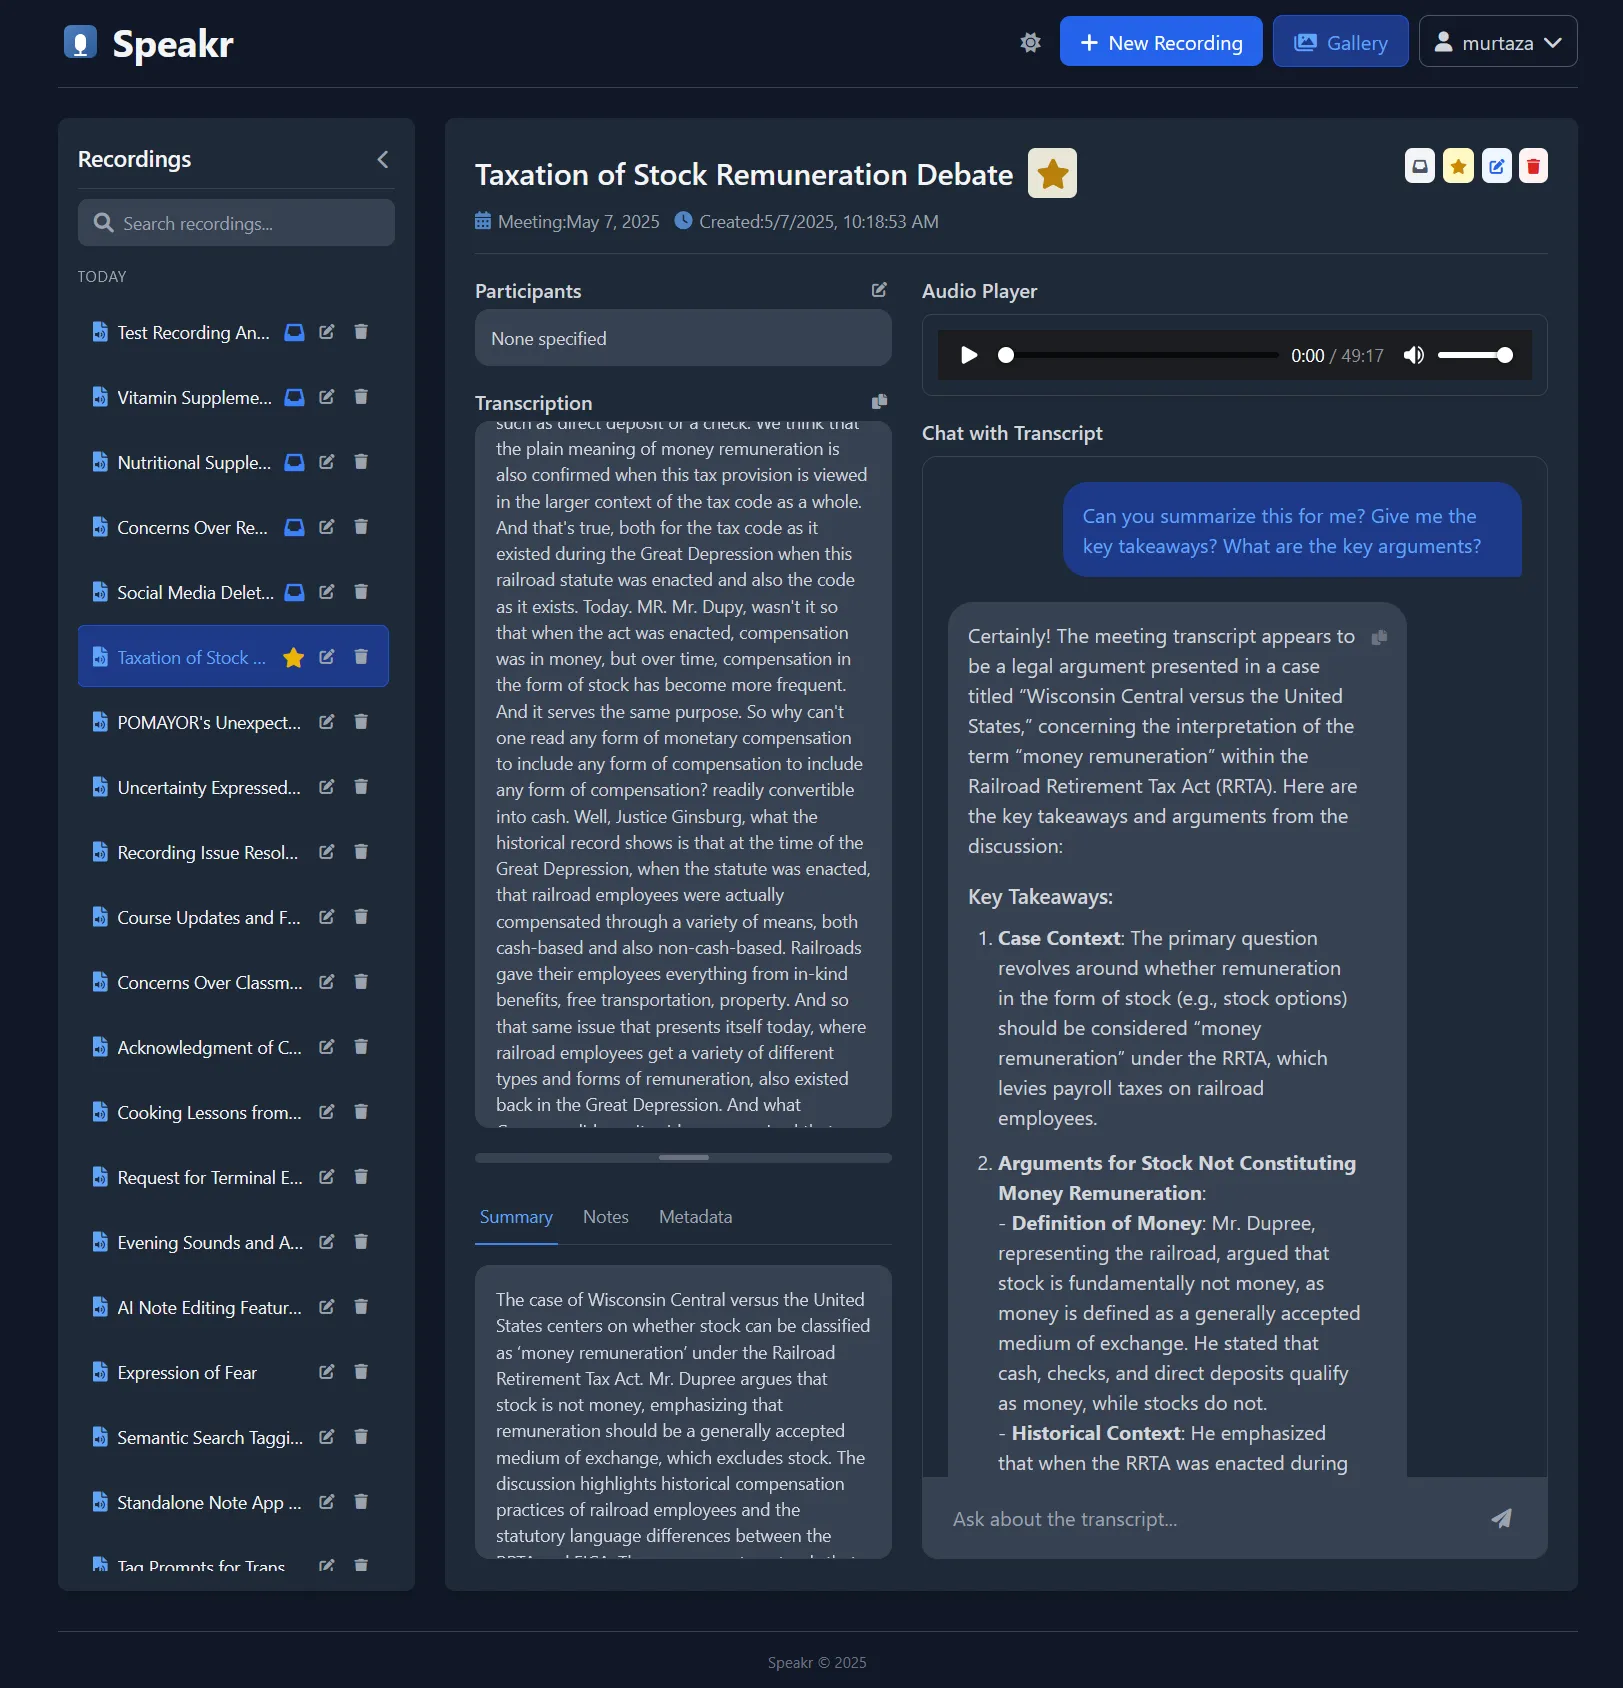
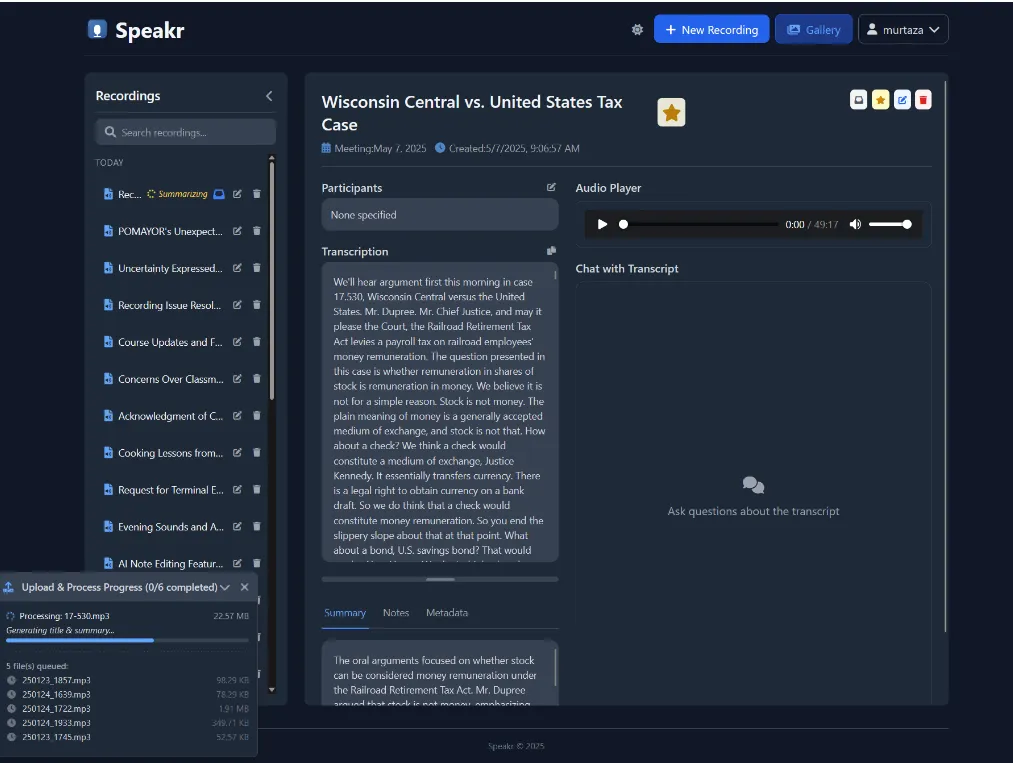
Speakr is a personal, self-hosted web application designed for transcribing audio recordings (like meetings), generating concise summaries and titles, and interacting with the content through a chat interface. Keep all your meeting notes and insights securely on your own server.
Screenshots

Features
Core Functionality:
- Audio Upload: Upload audio files (MP3, WAV, M4A, etc.) via drag-and-drop or file selection.
- Background Processing: Transcription and summarization happen in the background without blocking the UI.
- Transcription: Uses OpenAI-compatible Speech-to-Text (STT) APIs (configurable, e.g., self-hosted Whisper).
- AI Summarization & Titling: Generates concise titles and summaries using configurable LLMs via OpenAI-compatible APIs (like OpenRouter).
- Interactive Chat: Ask questions and interact with the transcription content using an AI model.
- Search, Inbox & Highlight: For highlighting and easy processing
- Metadata Editing: Edit titles, participants, meeting dates, summaries, and notes associated with recordings.
User Features:
- Authentication: Secure user registration and login system.
- Account Management: Users can change their passwords.
- Recording Gallery: View, manage, and access all personal recordings.
- Dark Mode: Switch between light and dark themes.
Admin Features:
- Admin Dashboard: Central place for administration tasks (
/admin). - User Management: Add, edit, delete users, and grant/revoke admin privileges.
- System Statistics: View overall usage statistics (total users, recordings, storage, etc.).
Technology Stack
- Backend: Python 3, Flask
- Database: SQLAlchemy ORM with SQLite (default)
- WSGI Server: Gunicorn
- AI Integration: OpenAI Python library (compatible with various endpoints like OpenAI, OpenRouter, or local servers)
- Authentication: Flask-Login, Flask-Bcrypt, Flask-WTF
- Frontend: Jinja2 Templates, Tailwind CSS, Vue.js (for interactive components), Font Awesome
- Deployment:
- Bash script (
setup.sh) for Linux/Systemd environments - Docker with automated builds via GitHub Actions
- Bash script (
Prerequisites
- Python 3.8+
pip(Python package installer)venv(Python virtual environment tool - usually included with Python)- Access to OpenAI-compatible API endpoints for:
- Speech-to-Text (e.g., Whisper - can be self-hosted)
- Language Model (e.g., via OpenRouter, OpenAI, or other compatible service)
- API Keys for the chosen endpoints.
- (For Deployment) A Linux server with
sudoaccess andsystemd.
Setup Instructions
IMPORTANT NOTE: Currently, only the Docker installation method is working. The Local Development and Deployment methods are not functional at this time.
Choose either Docker (recommended and currently the only working method), Local Development, or Deployment.
1. Docker Installation
The easiest way to deploy Speakr is using Docker and docker compose.
Option A: Using Pre-built Docker Images
-
Create a docker-compose.yml file:
services:app:image: learnedmachine/speakr:latestcontainer_name: speakrrestart: unless-stoppedports:- "8899:8899"volumes:- ./uploads:/data/uploads- ./instance:/data/instanceenvironment:# Database and upload folder configuration- SQLALCHEMY_DATABASE_URI=sqlite:////data/instance/transcriptions.db- UPLOAD_FOLDER=/data/uploads# Text model configuration- TEXT_MODEL_BASE_URL=https://openrouter.ai/api/v1- TEXT_MODEL_API_KEY=your_text_model_api_key_here- TEXT_MODEL_NAME=openai/gpt-4o-mini# Whisper model configuration- TRANSCRIPTION_BASE_URL=http://your_local_api_url:port/v1/- TRANSCRIPTION_API_KEY=your_transcription_api_key_here- WHISPER_MODEL=Systran/faster-distil-whisper-large-v3# Application settings- ALLOW_REGISTRATION=falseAlternatively, you can copy the example file:
cp docker-compose.example.yml docker-compose.ymlThen edit the file to update the environment variables with your actual values. Make sure to change the mount points to the correct paths.
-
Start the container:
docker compose up -d
Option A.1: Deploying with Portainer
If you’re using Portainer to manage your Docker containers:
- In Portainer:
- Go to Stacks → Add stack
- Name your stack (e.g., “speakr”)
- Upload the
docker-compose.example.ymlfile or paste its contents - Edit the environment variables with your actual values
- Click “Deploy the stack”
- Important Notes for Portainer:
- Make sure to update all environment variables with your actual values
- For volume persistence, you can either:
- Use named volumes as shown in the example file
- Or modify the volumes to use bind mounts to specific directories on your host
Option B: Building Locally
-
Clone the Repository:
git clone https://github.com/murtaza-nasir/speakr.gitcd speakr -
Configure Environment Variables:
-
Copy the example docker-compose file:
cp docker-compose.example.yml docker-compose.yml -
Edit the
docker-compose.ymlfile to update the environment variables with your actual API keys and settings as described in the Configuration section.
-
-
Build and Start the Container:
docker compose up -d -
Create an Admin User:
You can create an admin user in one of the following ways:
-
Option A: Using environment variables:
Create a
docker-compose.override.ymlfile:cp docker-compose.override.yml.example docker-compose.override.ymlEdit the file to uncomment and set the admin credentials:
services:app:environment:- ADMIN_USERNAME=admin- ADMIN_EMAIL=admin@example.com- ADMIN_PASSWORD=securepasswordThen restart the container:
docker compose downdocker compose up -d -
Option B: Using the create_admin.py script:
docker compose exec app python create_admin.pyFollow the interactive prompts to create an admin user.
-
-
Access Speakr: Open your web browser and navigate to
http://localhost:8899.
Customizing Data Storage
By default, all data (database and uploaded audio files) is stored in Docker volumes. To use custom directories on your host system:
-
Create a
docker-compose.override.ymlfile (if you haven’t already):cp docker-compose.override.yml.example docker-compose.override.yml -
Edit
docker-compose.override.ymland uncomment the volume mappings:services:app:volumes:- /path/to/your/uploads:/data/uploads- /path/to/your/database:/data/instance -
Replace
/path/to/your/uploadsand/path/to/your/databasewith actual paths on your system. -
Restart the container:
docker compose downdocker compose up -d
Updating the Docker Installation
To update the application to a newer version:
-
Pull the latest code:
git pull -
Rebuild and restart the container:
docker compose downdocker compose builddocker compose up -d
Your data will be preserved as it’s stored in Docker volumes or your custom mapped directories.
2. Local Development
NOTE: This method is currently not working. Please use the Docker installation method above.
Follow these steps to run Speakr on your local machine for development or testing.
-
Clone the Repository:
git clone https://github.com/murtaza-nasir/speakr.gitcd speakr -
Create and Activate Virtual Environment:
python3 -m venv venvsource venv/bin/activate# On Windows use: venv\Scripts\activate -
Install Dependencies:
pip install -r requirements.txt -
Configure Environment Variables:
-
Copy the example environment file
.env.exampleor create a new file named.envin the project root. -
Add the following variables, replacing placeholder values with your actual keys and endpoints:
# --- Required for Summaries/Chat ---# (Use OpenRouter or another OpenAI-compatible Chat API)TEXT_MODEL_API_KEY=sk-or-v1-... # Your OpenRouter or compatible API keyTRANSCRIPTION_BASE_URL="https://openrouter.ai/api/v1" # Or your chat model endpoint# Recommended Models: openai/gpt-4o-mini, google/gemini-flash-1.5, etc.TEXT_MODEL_MODEL_NAME="openai/gpt-4o-mini"# --- Required for Transcription ---# (Use OpenAI Whisper API or a compatible local/remote endpoint)TRANSCRIPTION_API_KEY="cant-be-empty" # Use your OpenAI key OR often "none", "NA", "cant-be-empty" for local endpointsTRANSCRIPTION_BASE_URL="http://YOUR_LOCAL_WHISPER_IP:PORT/v1/" # Your transcription endpoint URL# Set the specific model name your transcription endpoint uses (if needed by API)WHISPER_MODEL="Systran/faster-distil-whisper-large-v3" # Or the model your endpoint expects# --- Flask Specific ---# A strong, random secret key is crucial for session security.# Generate one using: python -c 'import secrets; print(secrets.token_hex(32))'SECRET_KEY="YOUR_VERY_STRONG_RANDOM_SECRET_KEY"# --- Optional ---# Set to 'false' to disable new user registrationsALLOW_REGISTRATION="true"
-
-
Database Setup & Migrations:
- The application uses SQLite by default, stored in
instance/transcriptions.db. - If you ever need to start completely fresh, you can use
python reset_db.py, but be careful as this deletes all data)
- The application uses SQLite by default, stored in
-
Create an Admin User:
-
Run the interactive script to create your first user with admin privileges:
python create_admin.py -
Follow the prompts to enter a username, email, and password.
-
-
Run the Application:
-
Option A (Flask Development Server - recommended for local dev):
flask run --host=0.0.0.0 --port=8899# Or (if flask command not found, ensure venv is active):# python app.py -
Option B (Gunicorn - closer to production):
gunicorn --workers 3 --bind 0.0.0.0:8899 --timeout 600 app:app
-
-
Access Speakr: Open your web browser and navigate to
http://localhost:8899(or your server’s IP address if running remotely).
3. Deployment (Linux with Systemd)
NOTE: This method is currently not working. Please use the Docker installation method above.
The deployment/setup.sh script automates the setup process on a Linux server using systemd.
Warning: Review the script carefully before running it, especially the paths and user ($USER) it assumes.
-
Copy Project: Ensure all project files (including the
deploymentdirectory and your configured.envfile) are on the target server. -
Make Script Executable:
chmod +x deployment/setup.sh -
Run Setup Script:
sudo bash deployment/setup.sh- This script will:
- Create
/opt/transcription-app. - Copy necessary files.
- Set up Python virtual environment and install dependencies.
- Ensure
.envexists and has aSECRET_KEY. - Create
uploadsandinstancedirectories. - Initialize or migrate the database (
reset_db.pyon first run,migrate_db.pyotherwise). - Set file ownership.
- Create and enable a
systemdservice (transcription.service) to run the app with Gunicorn. - Start the service.
- Prompt you to create an admin user.
- Create
- This script will:
-
Service Management:
- Check Status:
sudo systemctl status transcription.service - Stop Service:
sudo systemctl stop transcription.service - Start Service:
sudo systemctl start transcription.service - Restart Service:
sudo systemctl restart transcription.service - View Logs:
sudo journalctl -u transcription.service -f(follow logs) - View Recent Logs:
sudo journalctl -u transcription.service -n 100 --no-pager
- Check Status:
-
Access Speakr: Open your web browser and navigate to
http://YOUR_SERVER_IP:8899.
← Back to projects